Are you among those players who need to fix the Valorant launch issue on Windows? Here are seven troubleshooting methods to help you resolve the problem and carry on gaming.
1. Check the Minimum Requirements
Valorant is a graphics-intensive game. That means your system needs to pack components meet the minimum requirements of the Valorant game to run it without issues. However, if that doesn’t happen, you’re likely to face the launch issue.
Go through the Valorant hardware requirement page and see if your computer checks all the boxes. If not, you will have to upgrade your system to fix the Valorant launch issue.
2. Launch Valorant With Administrative Rights
It’s recommended to run AAA titles like Valorant with administrative rights. Lack of administrative permissions can cause a plethora of issues in these games, including the one at hand. So, launch Valorant with administrative rights and check if it resolves the issue. Here’s how to do that: Step 1: Press the Windows + E key to open File Explorer. Step 2: Click the address bar at the top and paste the location in it:
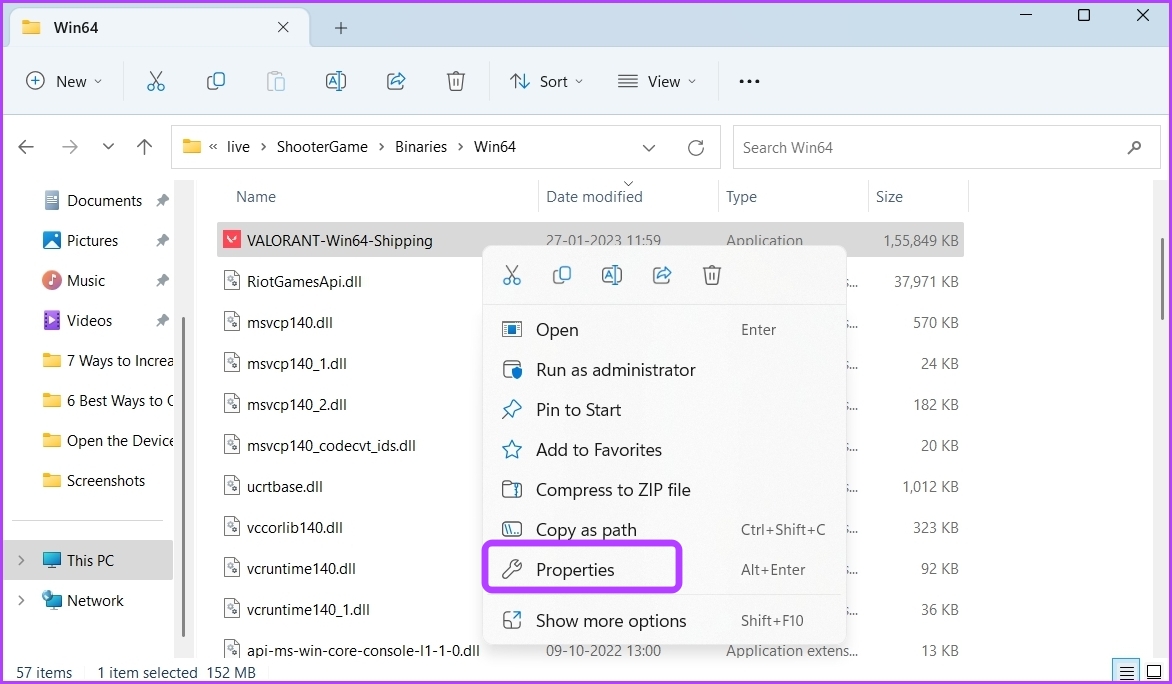
Step 3: Right-click on the VALORANT-Win64-Shipping file and choose Properties.
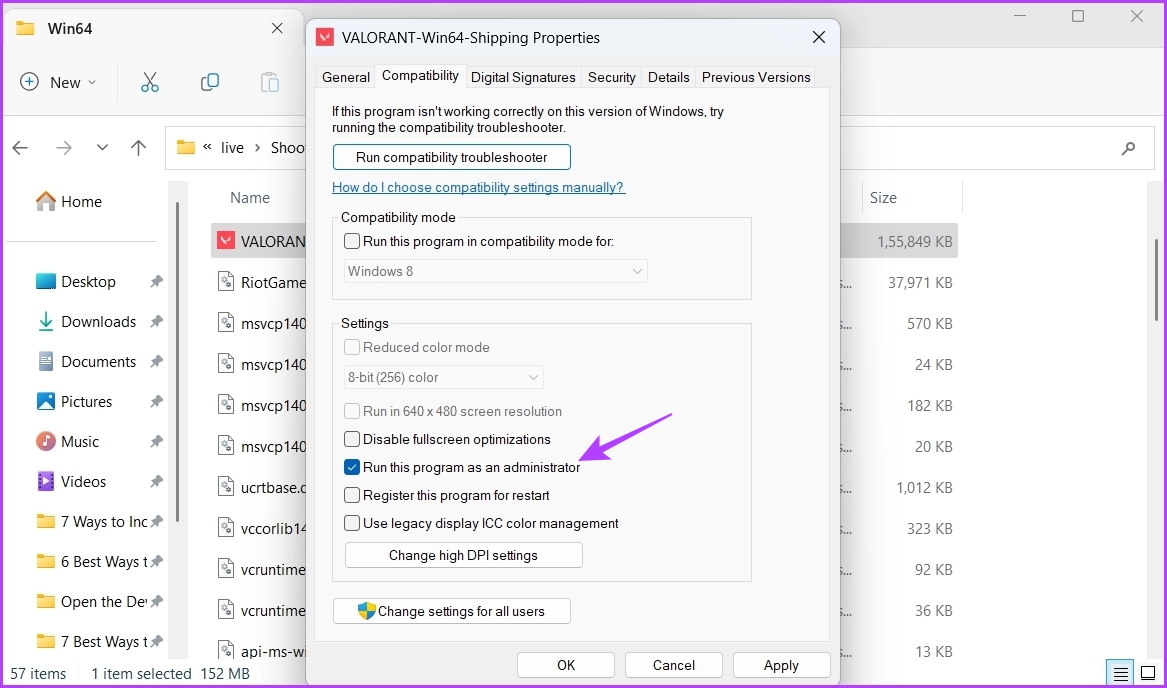
Step 4: Switch to the Compatibility tab and check the ‘Run this program as an administrator’ box.
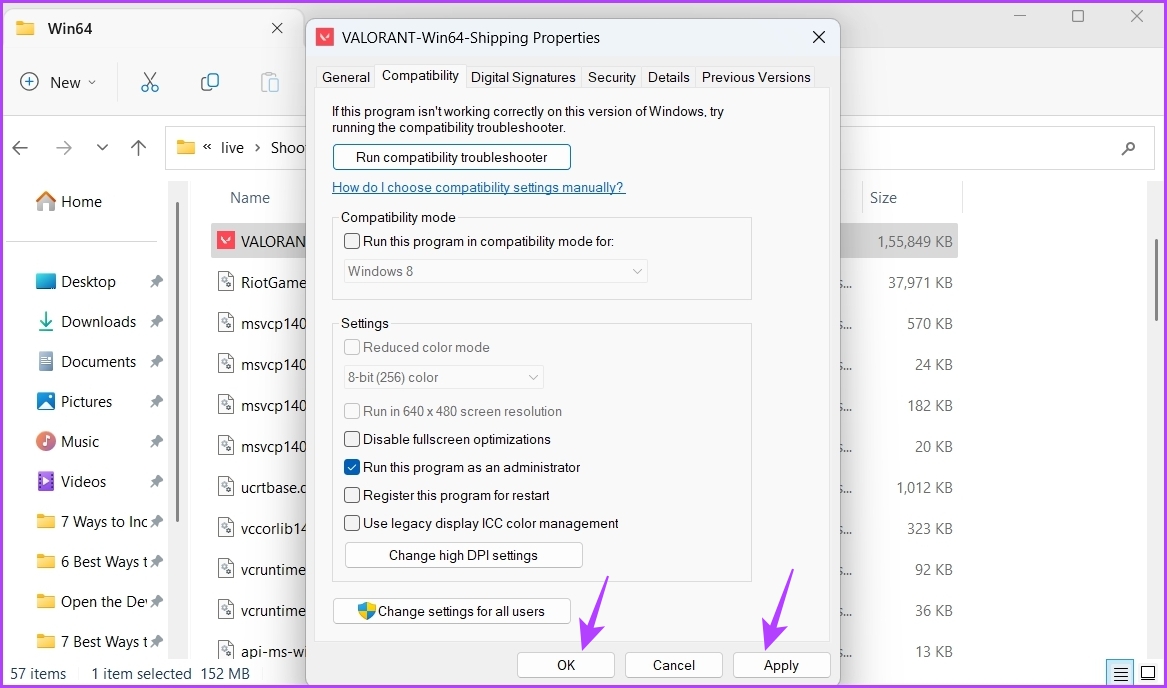
Step 5: Click Apply and OK to save the changes.
Next, launch Valorant and check if you’re still facing the issue.
3. Edit the Environment Variables
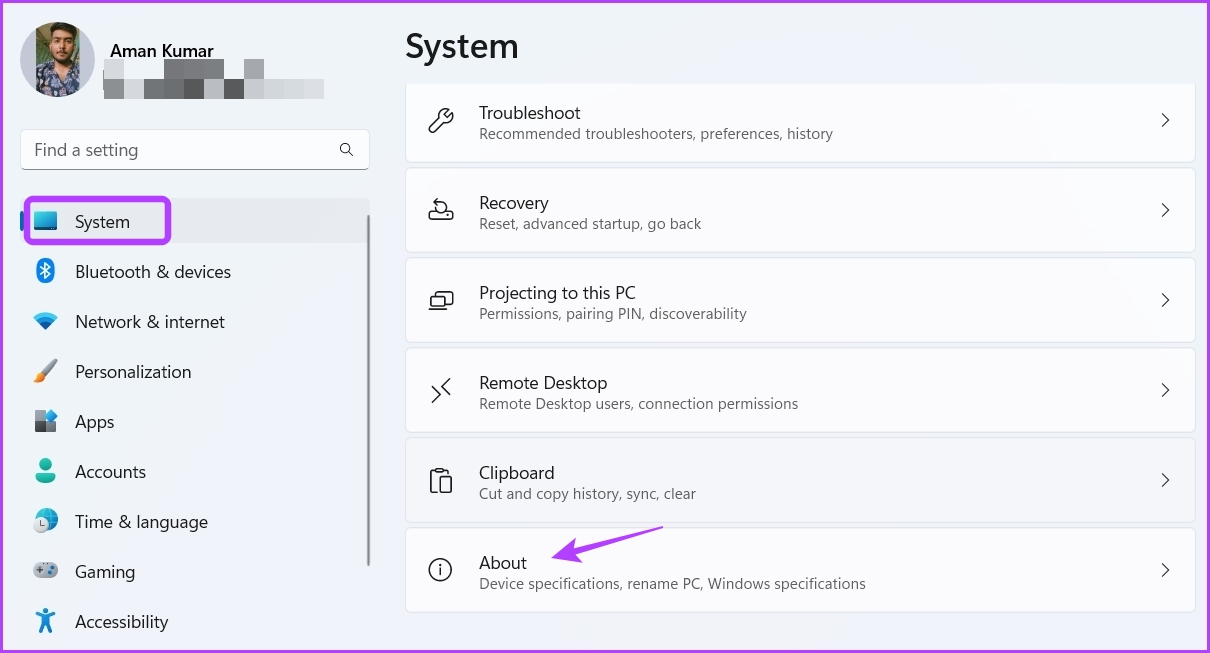
Environment variables contain data that Windows and other programs use to fetch crucial information. For many users, Valorant not launching issue was fixed by creating a new environment variable. This fix mainly works in computers featuring the Intel Processor. So, if you have an Intel processor computer, you can try the below steps and check if it solves the problem. Step 1: Press the Windows + I key to open the Settings app. Step 2: Click System from the left sidebar and select the About option from the right pane.
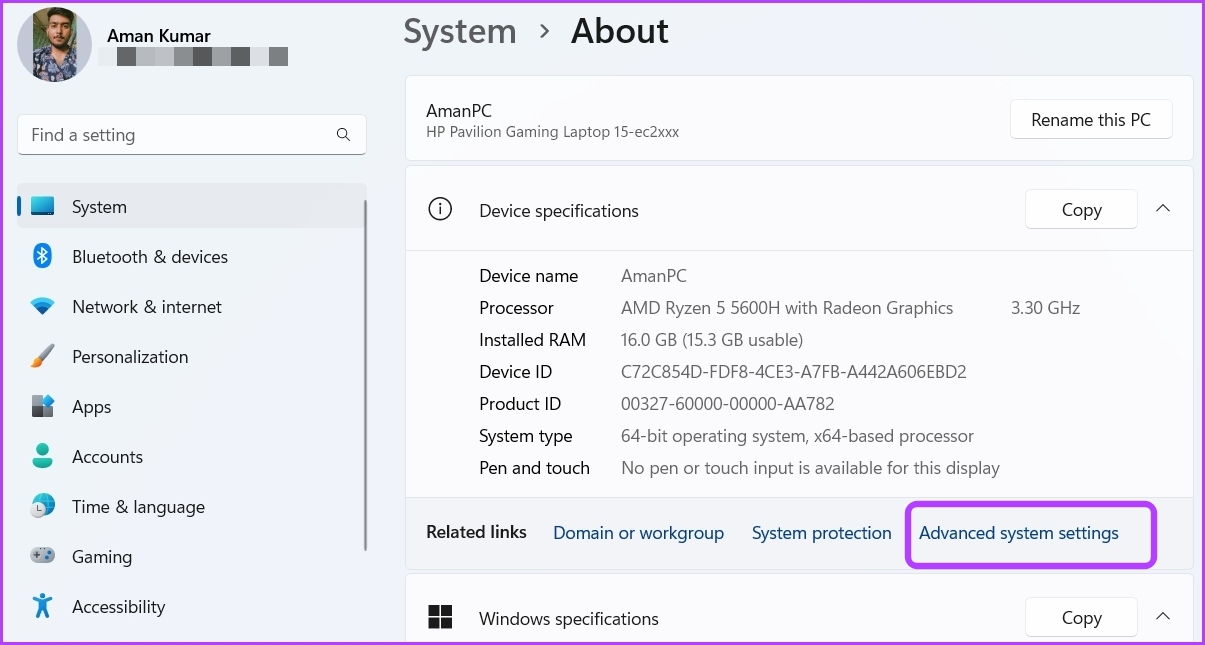
Step 3: Click the Advanced system settings option.
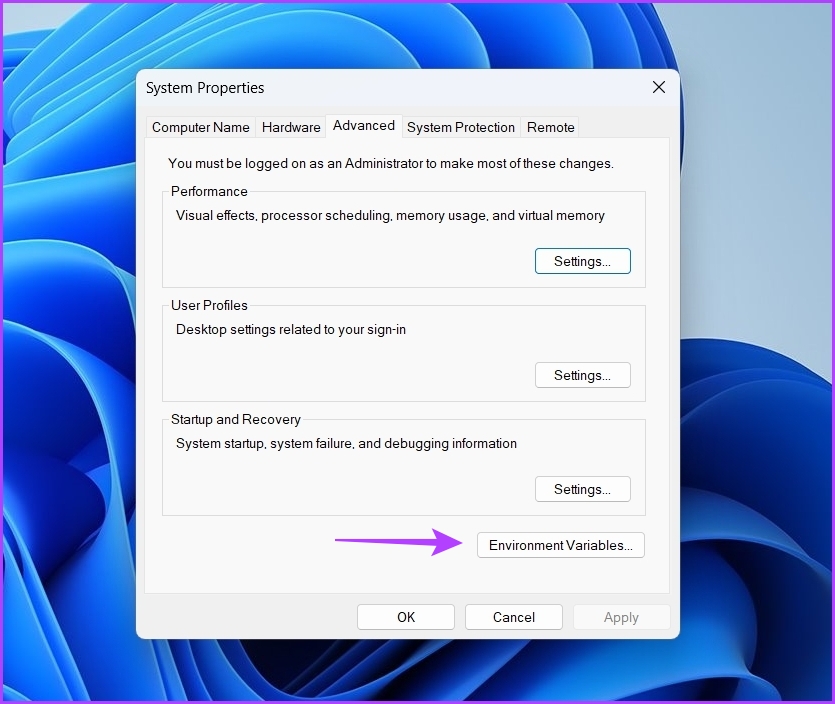
Step 4: Click the Environment Variables button.
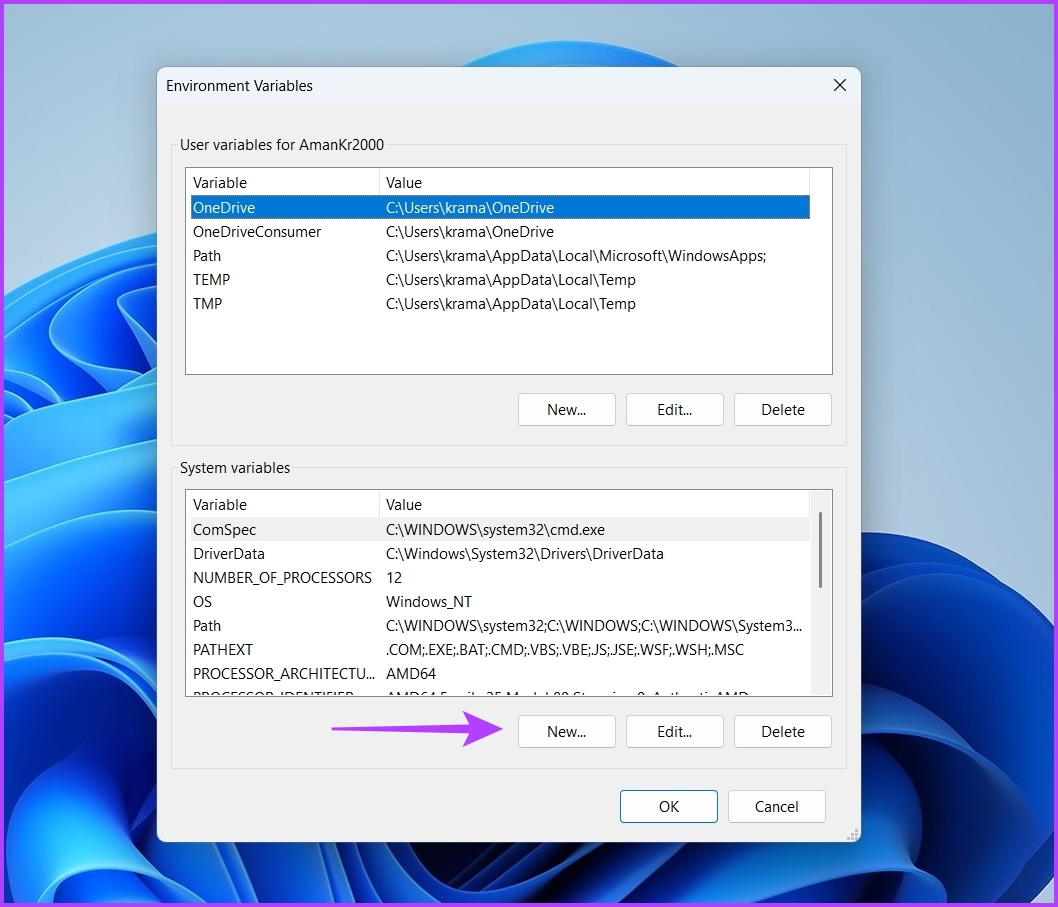
Step 5: Under the System variables section, click the New option.
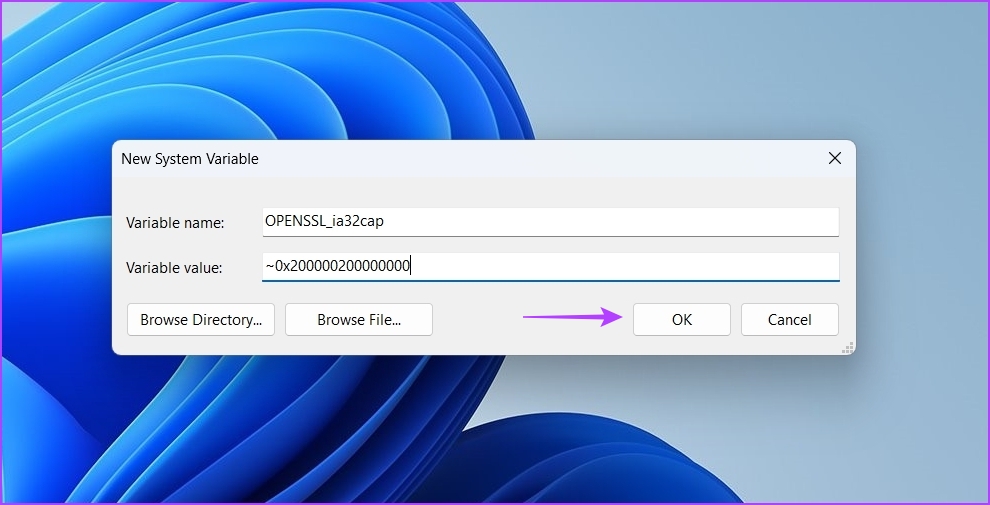
Step 6: Type OPENSSL_ia32cap in the Variable name field and ~0x200000200000000 in the Variable value field. Then, click OK to save.
Launch Valorant and check if the problem continues.
4. Update the Graphics Driver
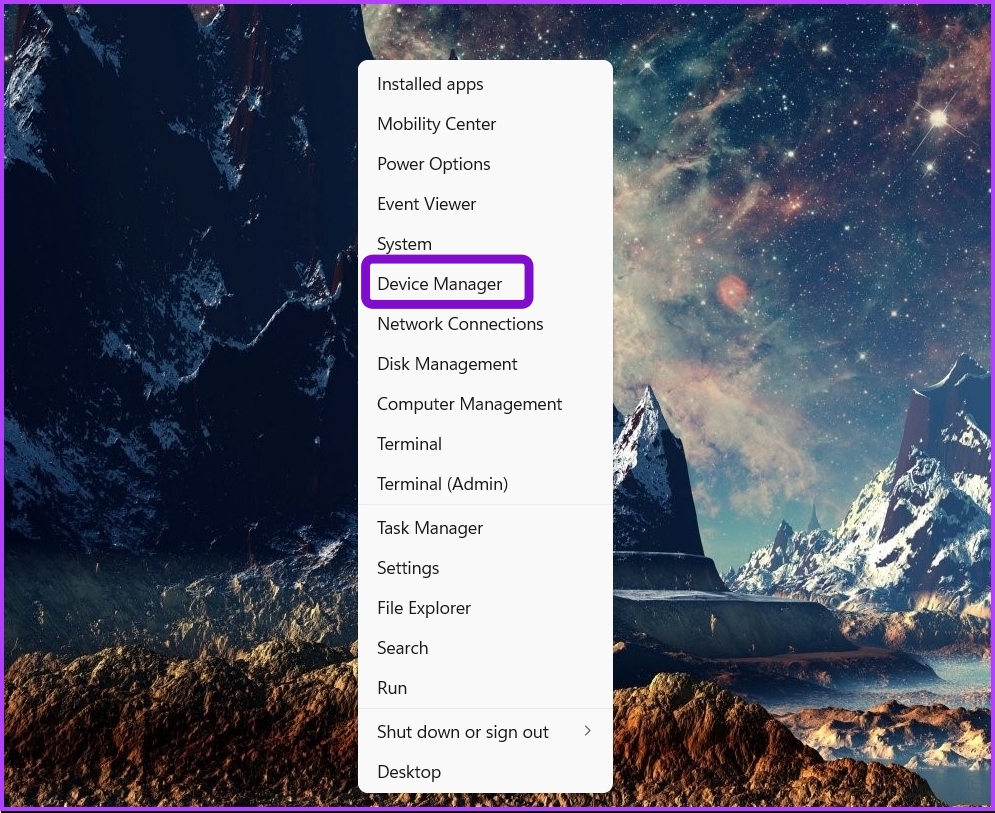
Updating the graphics driver is another effective way to fix Valorant not launching issue on Windows 11. Here’s how to download the latest graphics driver update on your computer: Step 1: Press the Windows + X key to open the Power User Menu. Step 2: Choose Device Manager from the list.
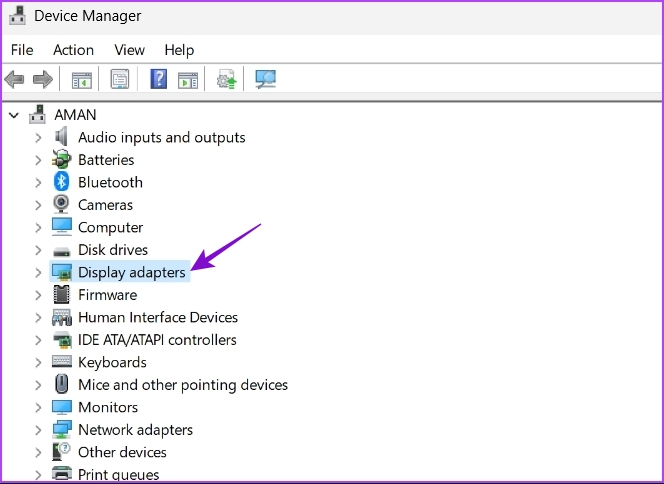
Step 3: Double-click on the Display adapters to expand it.
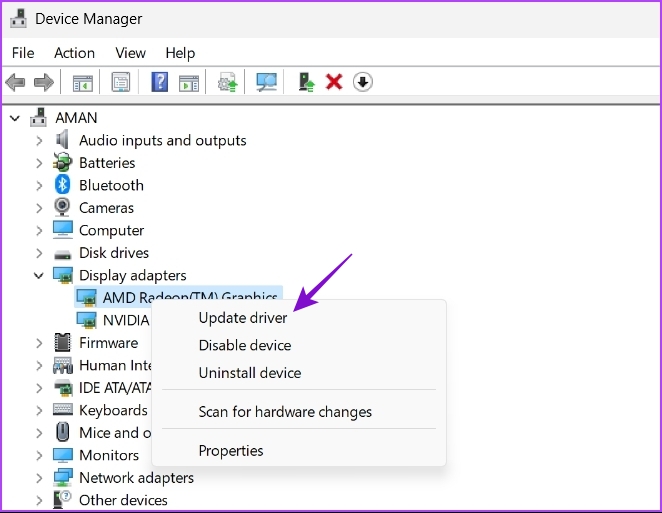
Step 4: Right-click on the installed graphics chip and choose Update driver.
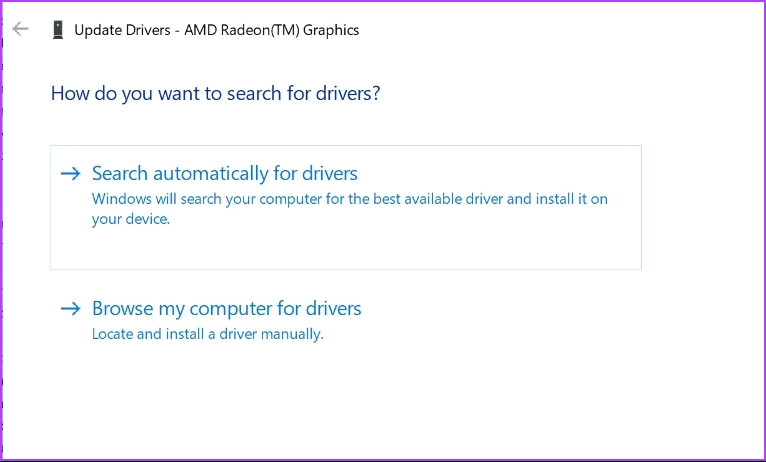
Step 5: Choose the Search automatically for drivers option.
Windows will now scan your computer for any available driver update and install it. After the installation is complete, restart your computer and check for the issue. If Windows fails to install the latest GPU drivers, check out our post on uninstalling existing graphics drivers completely before reinstalling the latest ones.
5. Close All Riot Processes From the Background
Another quick way to fix the problem is to open the Task Manager and close all the Riot-related processes running in the background. Here’s how to do that: Step 1: Open the Power User Menu, and choose Task Manager from the list.
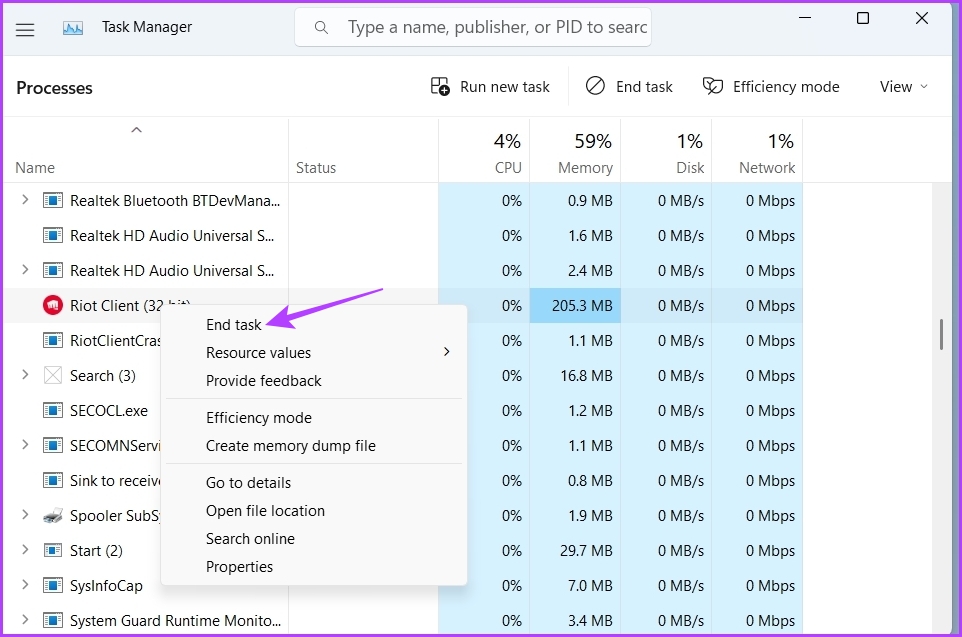
Step 2: In the Task Manager, right-click on all the processes associated with the Riot client and choose End task.
6. Run Valorant in Comparability Mode
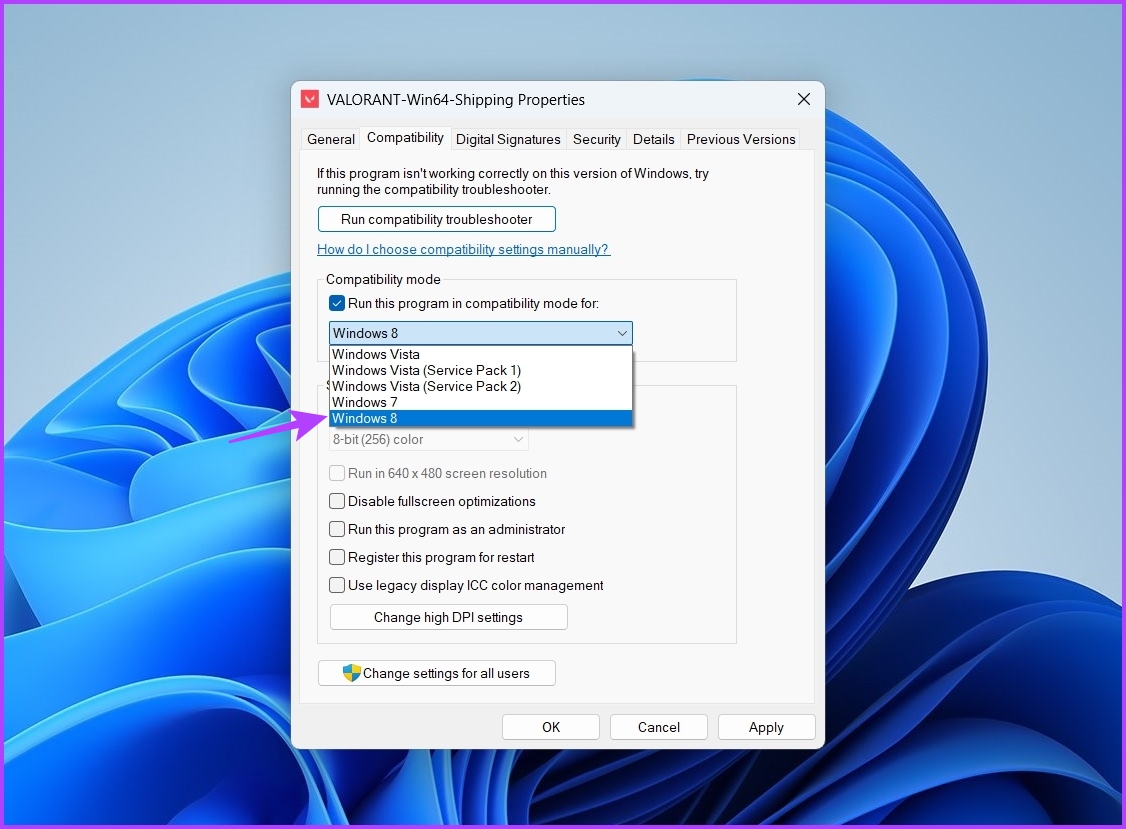
Have you started facing the launch issue after upgrading to Windows 11? If yes, then Valorant is probably facing compatiblity issue with Windows 11. The solution, in this case, is to use the compatibility mode, which will allow Valorant to run as if it was running in an older version of Windows. Here’s how to turn on compatibility mode for Valorant: Step 1: Right-click on the Valorant executable file and choose Properties. Step 2: Switch to the Compatibility tab. Step 3: Check the Run this program in compatibility mode for box and choose Windows 8 from the drop-down menu.
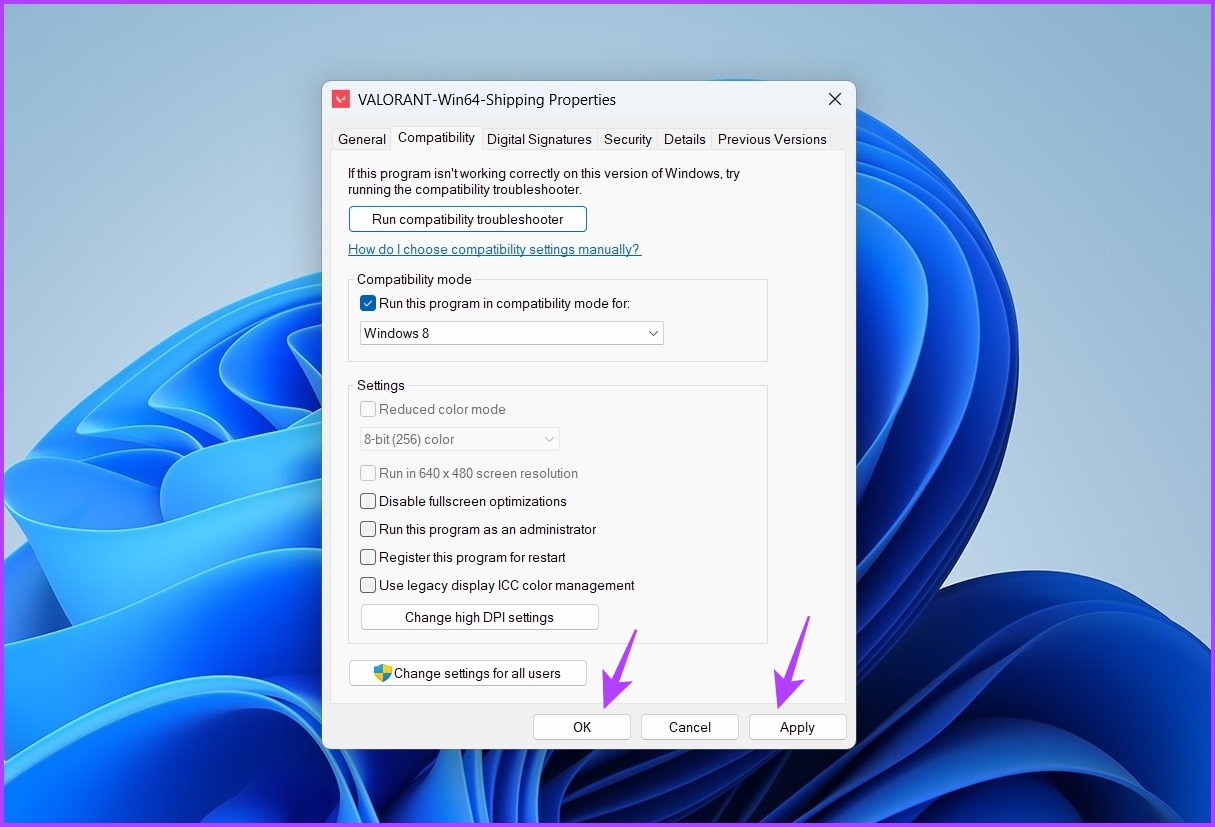
Step 4: Click Apply and OK to save the changes.
7. Check the VGC Service Status
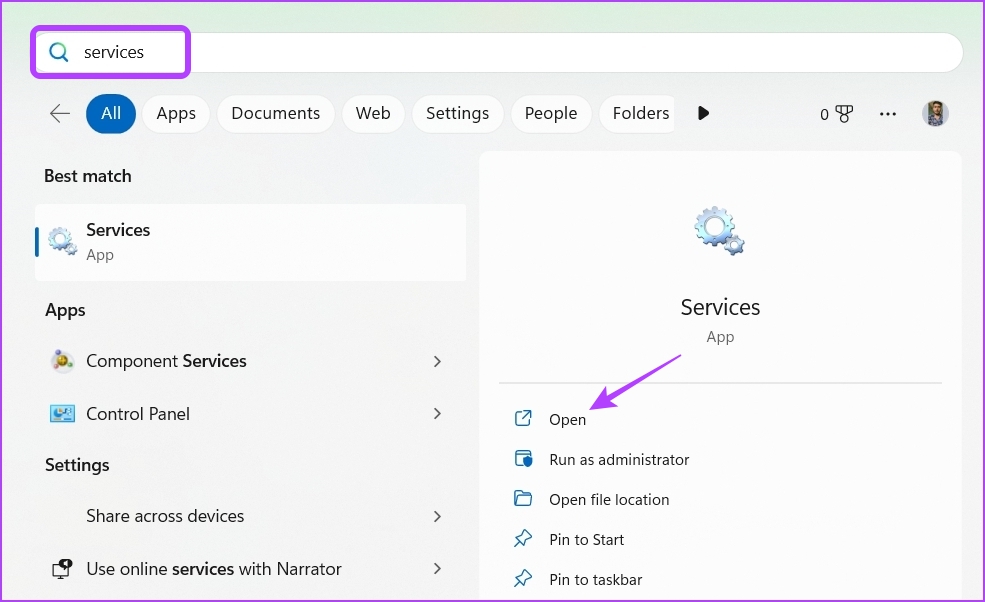
Valorant Game Coordinator (VGC) is an important Valorant service that might be running in the background for the game to launch smoothly. You can check and change the status of this service by following the below instruction: Step 1: Press the Windows + S key to open Windows Search, type Services and choose Open from the right pane to launch the Services window.
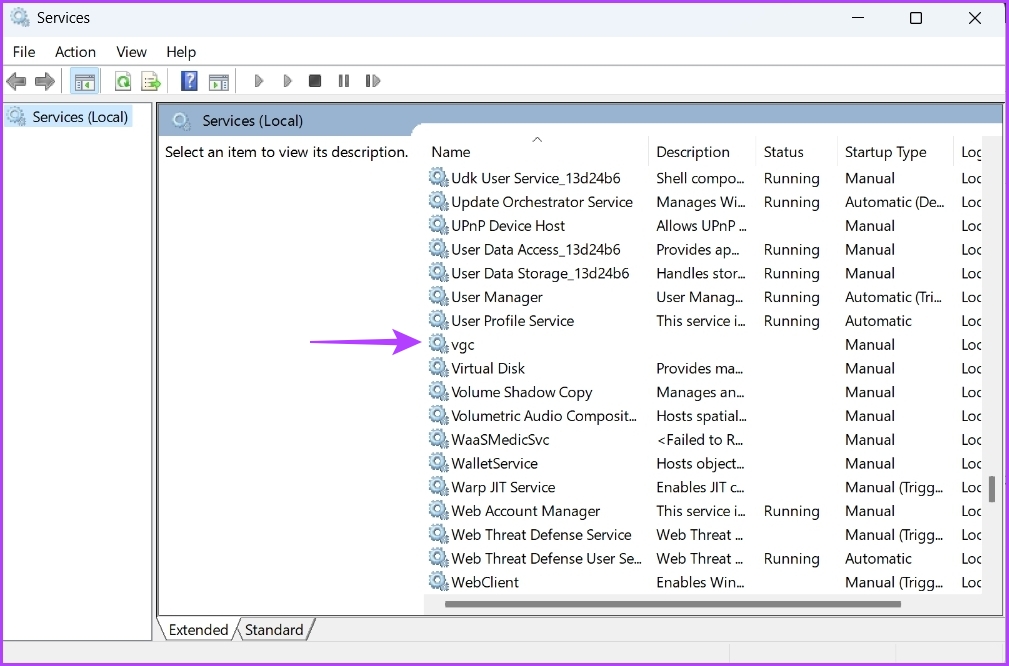
Step 2: In the Services window, double-click on the vgc service to open its properties window.
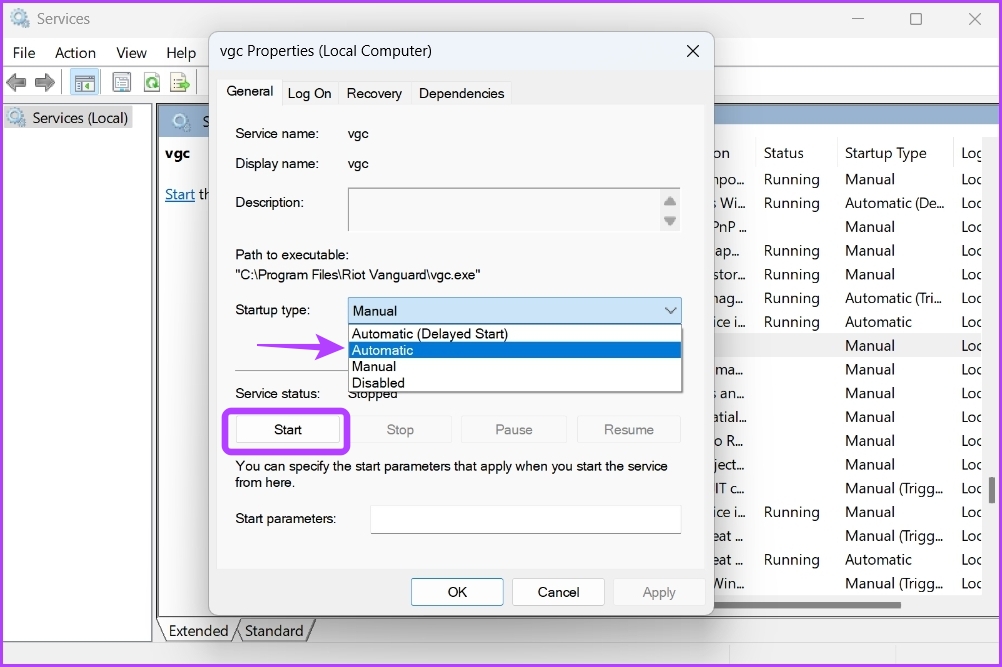
Step 3: Change the Startup type to Automatic, and click the Start button.
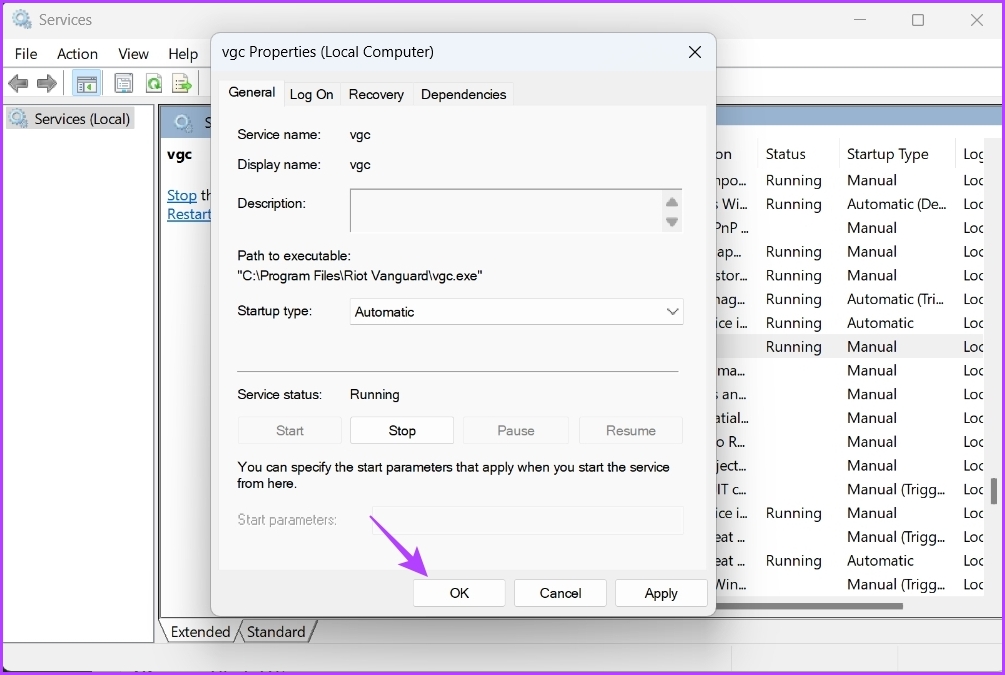
Step 4: Click OK.
If Services window fails to launch, read our post on what to do when services is not opening on Windows 11.
Play Valorant Without Any Issue
Getting Valortant to launch normally on Windows 11 is possible and you don’t have to re-install the entire game to play it. Fortunately, you can quickly troubleshoot this problem by applying the above fixes. The above article may contain affiliate links which help support Guiding Tech. However, it does not affect our editorial integrity. The content remains unbiased and authentic.







![]()


