We will share the quick and easy steps to add your credit card to Safari on iPhone, iPad, and Mac. But first, we recommend that you update your iPhone, iPad, and Mac with the latest version of iOS, iPadOS, and macOS respectively. That’ll ensure that your device runs the latest Safari browser version.
Add Credit Card in Safari on Mac
To sort out your browsing experience, you can create Tab Groups in Safari that will let you divide your tabs into different categories like Shopping, Movies, Books, and more. That helps you use your credit card information and process payments for all those websites instantly. Here’s how to add your credit card in Safari on Mac. Step 1: Press Command + Spacebar to open Spotlight Search, type Safari, and press Return.
Step 2: Click on Safari in the top-left corner.
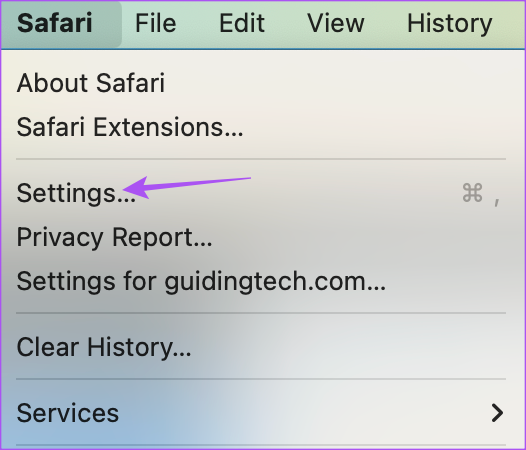
Step 3: Select Settings from the list of options.
Step 4: Click on Autofill in the Settings window.
Step 5: Select the checkbox next to Credit Cards to enable the feature.
Step 6: Click on Edit next to Credit Cards.
Step 7: Use Touch ID or enter your Passcode to access the Credit Cards window.
Step 8: Click the Plus icon in the bottom-left corner to add your card.
Step 9: Add your Credit Card details and click on Done in the bottom-right corner.
After you add the credit card, visit one of the shopping sites to check how Autofill feature works to add your payment information.
Remove Credit Card Details From Safari on Mac
Here’s how you can remove your stored credit card from Safari on Mac. Step 1: Press Command + Spacebar to open Spotlight Search, type Safari, and press Return.
Step 2: Click on Safari in the top-left corner.
Step 3: Select Settings from the list of options.
Step 4: Click on Autofill in the Settings window.
Step 5: Click on Edit next to Credit Cards.
Step 6: Use Touch ID or enter your Passcode to access the Credit Cards window.
Step 7: Select your credit card from the left window and click the Minus icon in the bottom-left corner.
Step 8: Click on Done to confirm the removal of your credit card.
Refer to our posts if Safari keeps crashing on your Mac.
Add Credit Card in Safari on iPhone and iPad
The Safari browser on your iPhone or iPad also lets you add your credit card details. In case the website doesn’t work well on your iPhone or iPad, you can request the Desktop version of the website. Here’s how you can add your credit card in Safari on iPhone and iPad. The steps are the same for both iPhone and iPad users. Step 1: Open Settings on your iPhone or iPad.
Step 2: Scroll down and tap on Safari.
Step 3: Scroll down and tap on Autofill.
Step 4: Tap the toggle next to Credit Cards to enable the Autofill feature.
Step 5: Tap on Saved Credit Cards.
Step 6: Tap on Add Credit Card.
Step 7: Add your credit card details.
You can also tap on Use Camera to click a picture of your credit card for filling out the details.
Step 8: Tap on Done in the top-right corner.
Your card will be added in the Autofill section of Safari.
Remove Credit Card Details From Safari on iPhone and iPad
Here’s how you can remove your credit card from Safari on your iPhone and iPad. The steps are the same for both the platforms. Step 1: Open Settings on your iPhone or iPad.
Step 2: Scroll down and tap on Safari.
Step 3: Scroll down and tap on Autofill.
Step 4: Tap on Saved Credit Cards.
Step 5: Tap on Edit in the top-right corner.
Step 6: Select the credit card that you want to remove from Safari.
Step 7: Tap on Delete in the top-left corner to remove the selected credit card.
Step 8: Tap on Delete again at the bottom to confirm your choice.
That will remove your credit card details from Safari.
Add to Cart and Pay Quickly
Saving a credit card in Safari browser will automatically fill in the payment details while making payments on a website. In case a website is not opening on Safari or you are facing login issues. you can try clearing the Cache and Cookies in Safari for that website to check if the problem gets solved. The above article may contain affiliate links which help support Guiding Tech. However, it does not affect our editorial integrity. The content remains unbiased and authentic.


