You can’t access the latest games, your library, or check your friends’ group when you run into a Steam connection error on Windows. Steam not connecting to the internet can be due to network issues on Windows, a buggy app, and other factors. Let’s explore them.
1. Go Online on Steam
Steam comes with a dedicated offline mode. If you have enabled it, Steam can’t connect to the internet. Step 1: Launch the Steam app on your Windows computer. Step 2: Select Steam at the top and click Go Online option.
Step 3: Confirm leaving the offline mode on Steam.
2. Check Steam Server Status
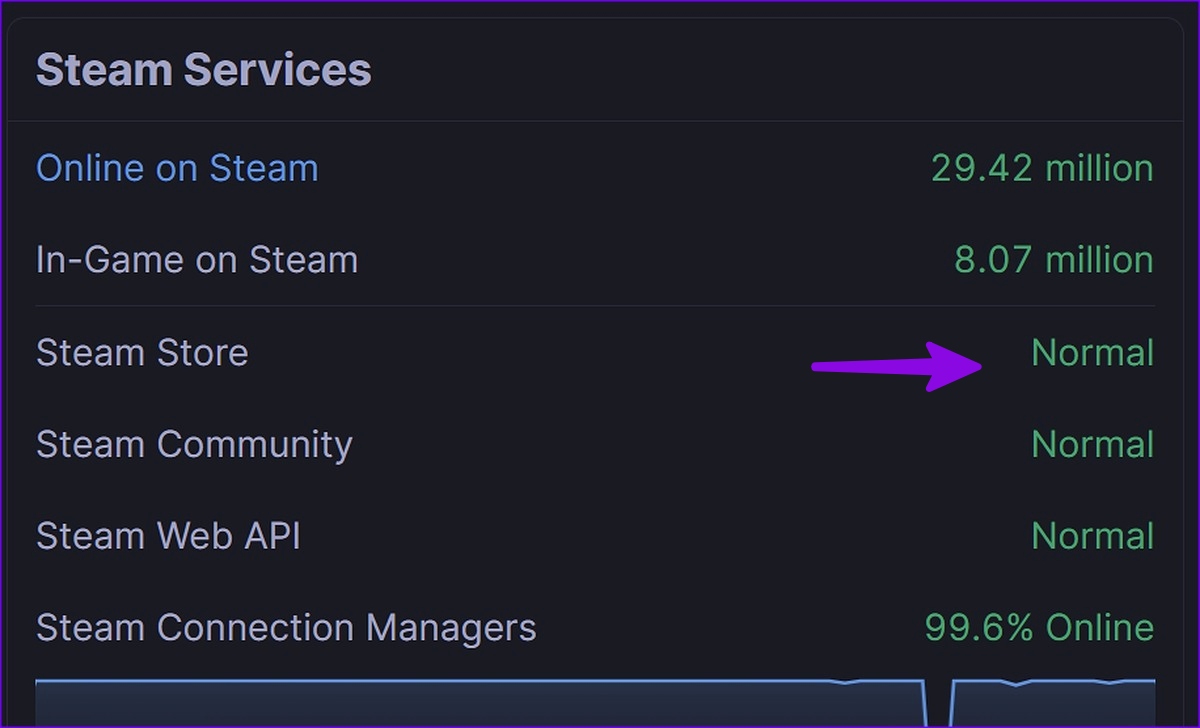
When Steam servers face an outage, you run into errors like ‘could not connect to Steam network.’ The company doesn’t offer a dedicated page to check the server status. You can visit steamstat and make sure Steam Store, community, and web APIs are running in normal conditions. You can also check server capacity in your region.
If Steam servers are down, wait for the company to resolve the issues from their end and try again.
3. Confirm Active Internet Connection on Windows
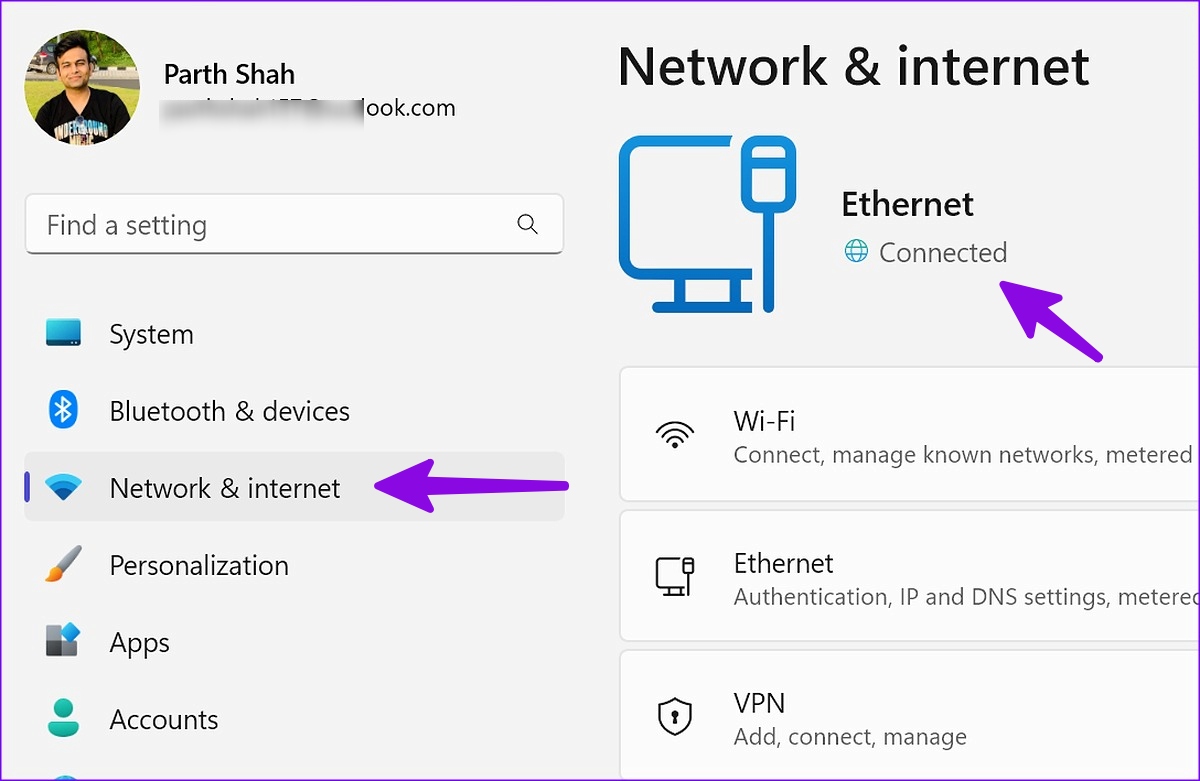
You should confirm an active internet connection on Windows before opening Steam. You can connect to a high-speed Wi-Fi network and use the steps below. Step 1: Press Windows + I shortcut to open the Settings app on your Windows computer. Step 2: Select Network & internet from the sidebar and confirm the Connected status.
You’ll need to opt for an Ethernet network for reliable internet speeds.
4. Run Steam as an Admin
You can fix the Steam connection error by running the app as an admin on your Windows PC. Step 1: Press the Windows key, type Steam in the Window Search. Step 2: Right-click on Steam from the search results and select ‘Run as administrator.’
Continue reading if Steam says no internet connection.
5. Troubleshoot Router
If your home or office router is acting up, switch it off and turn on after a couple of minutes. You can also upgrade router firmware to the latest version to troubleshoot it.
6. Disable VPN on Windows
You may run into a Steam connection error on an active VPN network. You should disable the VPN network and try again. Let’s take ExpressVPN as an example for this guide. Step 1: Open ExpressVPN on Windows. Step 2: Click the power button icon and turn off the ExpressVPN.
7. Run Network Troubleshooter
Windows comes with a built-in troubleshooter to fix network issues. Here’s how to run it. Step 1: Press Windows + I shortcut to open the Settings app. Select System from the leftsidebar and chooses select Troubleshoot from the right pane.
Step 2: Select Other troubleshooters.
Step 3: Click the Run button next to the Internet Connections and follow the on-screen instructions.
After you complete the internet connections troubleshooter, open Steam to access your library.
8. Reinstall Network Adapters
You can reinstall network adapters to fix the Stream connection error on Windows. Step 1: Right-click on Windows key and select Device Manager from the Power User Menu.
Step 2: Expand Network adapters. Right-click on an adapter and select Uninstall device.
Step 3: Confirm your decision and restart the PC.
9. Reset Your TCP/IP Stack
Resetting TCP/IP stack is another common way to fix network issues on Windows. Of course, that means you computer will reset all network settings. Step 1: Press the Windows key, type Command Prompt and hit Enter to launch the Command Prompt window.
Step 2: In the Command Prompt window, type the following commands and hit Enter after each command.
Restart the computer and try running Steam again.
10. Turn Off Windows Firewall Temporarily
An active Windows Firewall may interfere with Steam on your PC. You may temporarily disable Windows Firewall to run Steam without any problem. Step 1: Click the Windows key on the taskbar, type Firewall & network protection and hit Enter.
Step 2: In the Windows Security window, select Private network.
Step 3: Turn off the toggle under Microsoft Defender Firewall from the following menu.
11. Update Steam
Steam regularly releases new updates to add features and fix bugs. You should install the latest update to troubleshoot network issues. Step 1: Open the Steam app on your PC. Step 2: Click Steam menu at the top-right corner and select ‘Check for Steam Client Updates.’
Download and install the latest Steam update.
12. Reinstall Steam
If you’re out of your wits and none of the solutions work, it’s a good idea to perform a clean reinstall of the Steam app. This only applies to the Steam client app. Step 1: Press the Windows + I shortcut to open the Settings app. Select Apps from the left sidebar and click Installed Apps from the right pane.
Step 2: Search for Steam and click the three horizontal dots menu beside next to Steam. Then, choose Uninstall to remove the app from your computer.
Step 3: Download Steam for Windows from the official website. Install Steam on Windows
Access Your Steam Library on Windows
Steam not connecting to the internet can prevent you from accessing your favorite titles on the store. Which trick resolved the ‘could not connect to Steam network’ issue on Windows? Share your finding with us in the comments below. The above article may contain affiliate links which help support Guiding Tech. However, it does not affect our editorial integrity. The content remains unbiased and authentic.


