If Windows 11 is failing to recognize your microphone or preventing you from using it, don’t fret. In this guide, we’ve listed the practical solutions for fixing microphone issues on Windows 11. So, let’s check them out.
1. Perform Basic Checks
If you’re using an external microphone on your PC, you can start by checking its physical connection to check if it’s connected properly. Further, you’ll also need to ensure that it’s plugged into the correct audio jack if your PC has separate audio ports for input and output. Likewise, if it’s a USB mic, try connecting it to a different USB port.
Besides this, if your microphone has a physical mute switch, make sure you turn it off.
2. Enable the Microphone
Next, you’ll need to check if you’ve accidentally disabled the microphone adapter on your PC. To do so, you’ll need to access the Device Manager. Step 1: Press the Windows key + X to open the Power User menu and select Device Manager from the list.
Step 2: Double-click on ‘Audio inputs and outputs’ to expand. Right-click on Microphone and select Enable device.
If the microphone is already enabled, try disabling it and enabling it again. After that, check if the issue is still there.
3. Allow Apps to Use Your Microphone
If the issue remains even after enabling the microphone, there’s a chance that apps on your PC do not have the required permission to access the microphone. Here’s how you can change that. Step 1: Press the Windows key + I to launch the Settings app. In the Privacy & security tab, scroll down to App permissions and select Microphone.
Step 2: Enable the switch next to Microphone access and ‘Let apps access your microphone.’
Next, scroll down to ensure that your favorite apps have access to the microphone.
4. Check the Default Audio Input Device and Volume
If you’ve connected several audio devices to your PC, it’s important to double-check if your preferred microphone is set as the default audio input device. Here’s how you do it. Step 1: Right-click on the speaker icon on the Taskbar and select Sound settings from the resulting menu.
Step 2: Under Input, choose your preferred microphone and check its volume.
5. Unmute Microphone
Aside from selecting the appropriate input device in the Settings app, you should check the microphone your app uses. Also, if the other person cannot hear your voice, check to see if the microphone is muted. If the microphone not working issue on your Windows device is limited to a specific app, such as Microsoft Teams or Zoom, our guides on the same should help.
Besides, if you’re running Windows 11 Insider Preview Build 22494 or later, Microsoft has also introduced a universal mute button that lets you mute or unmute your microphone directly from the Taskbar. So, check if you’ve accidentally muted your microphone from there.
6. Restart the Windows Audio Service
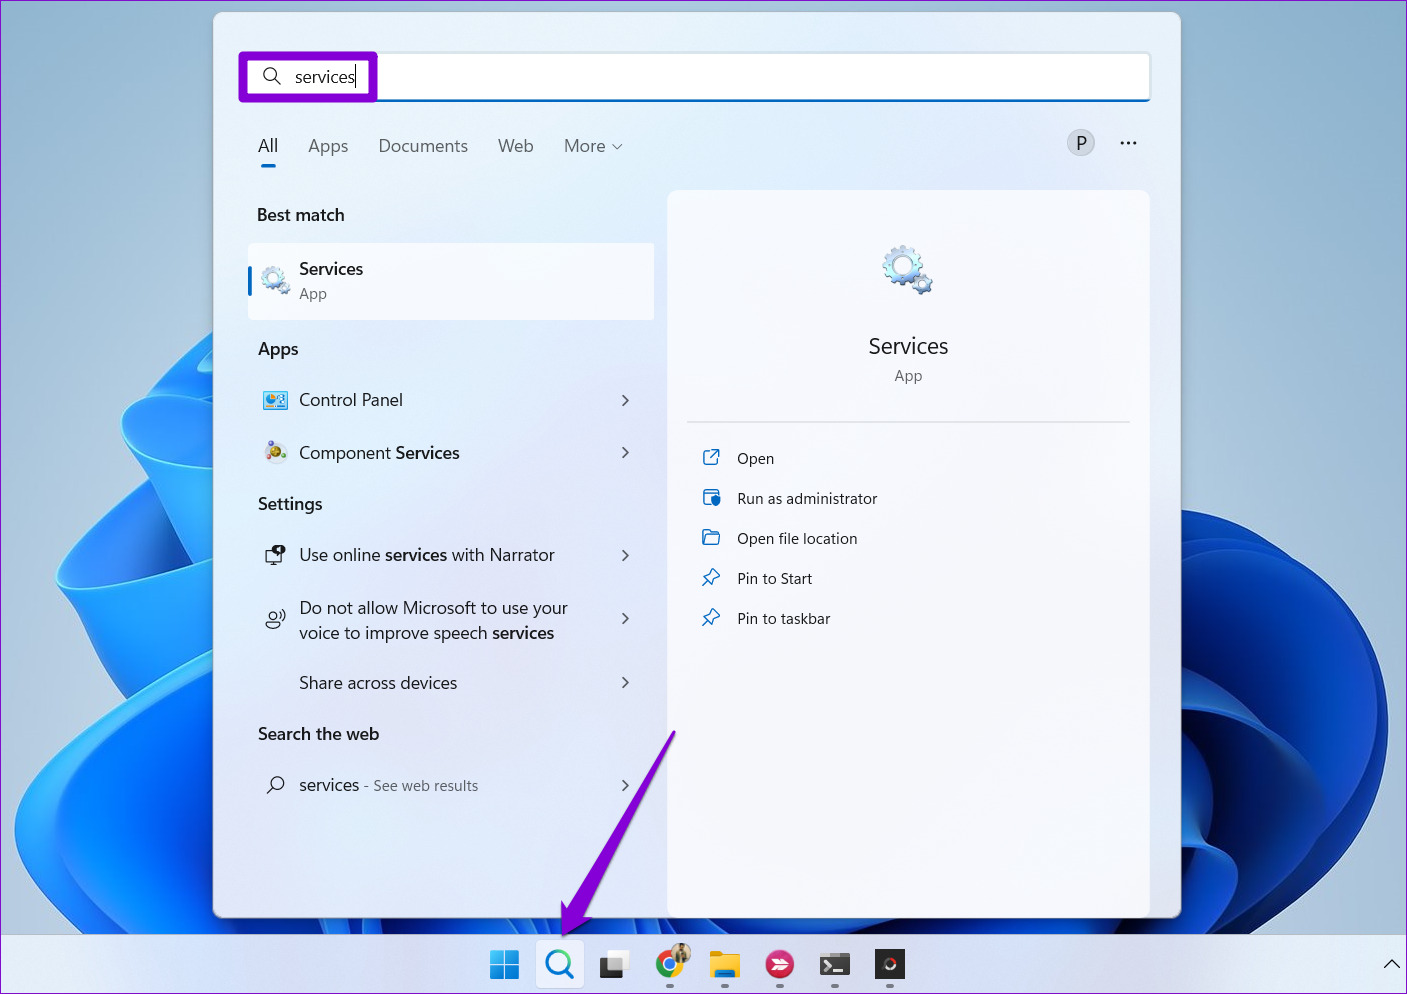
Windows Audio is a system service that manages all your audio devices, including the microphone. If this service is not running properly, you could experience issues like the one discussed here. You can try restarting the Windows Audio service on your PC and see if that gets the microphone to work again. Step 1: Click the search icon on the taskbar, type services, and press Enter.
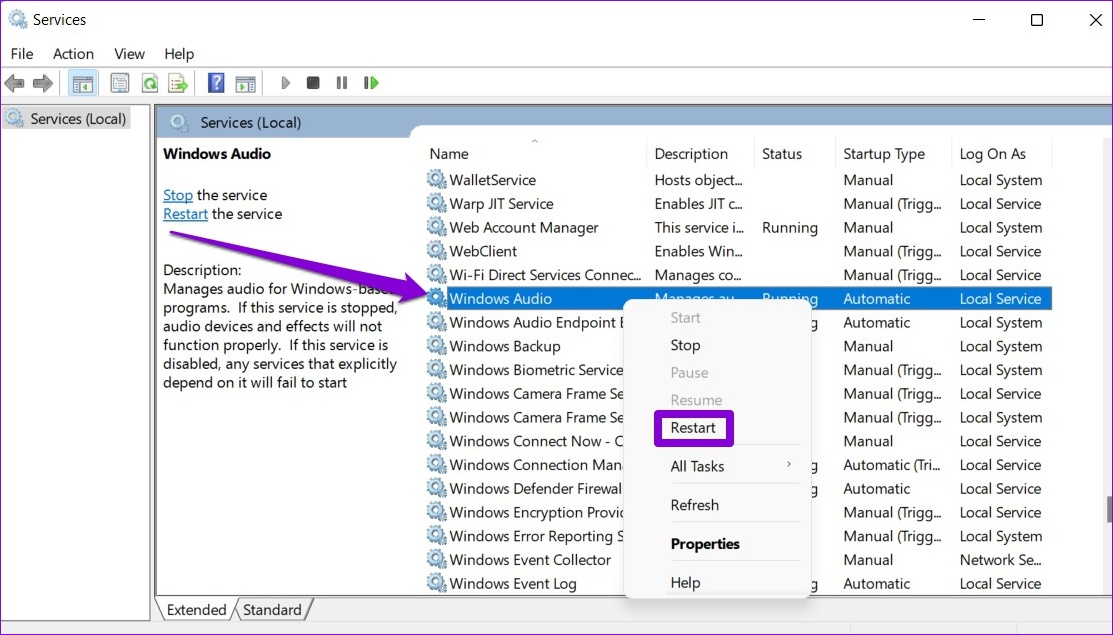
Step 2: In the Services window, scroll down to locate the Windows Audio service. Right-click on it and select Restart from the list.
7. Run Windows Troubleshooter
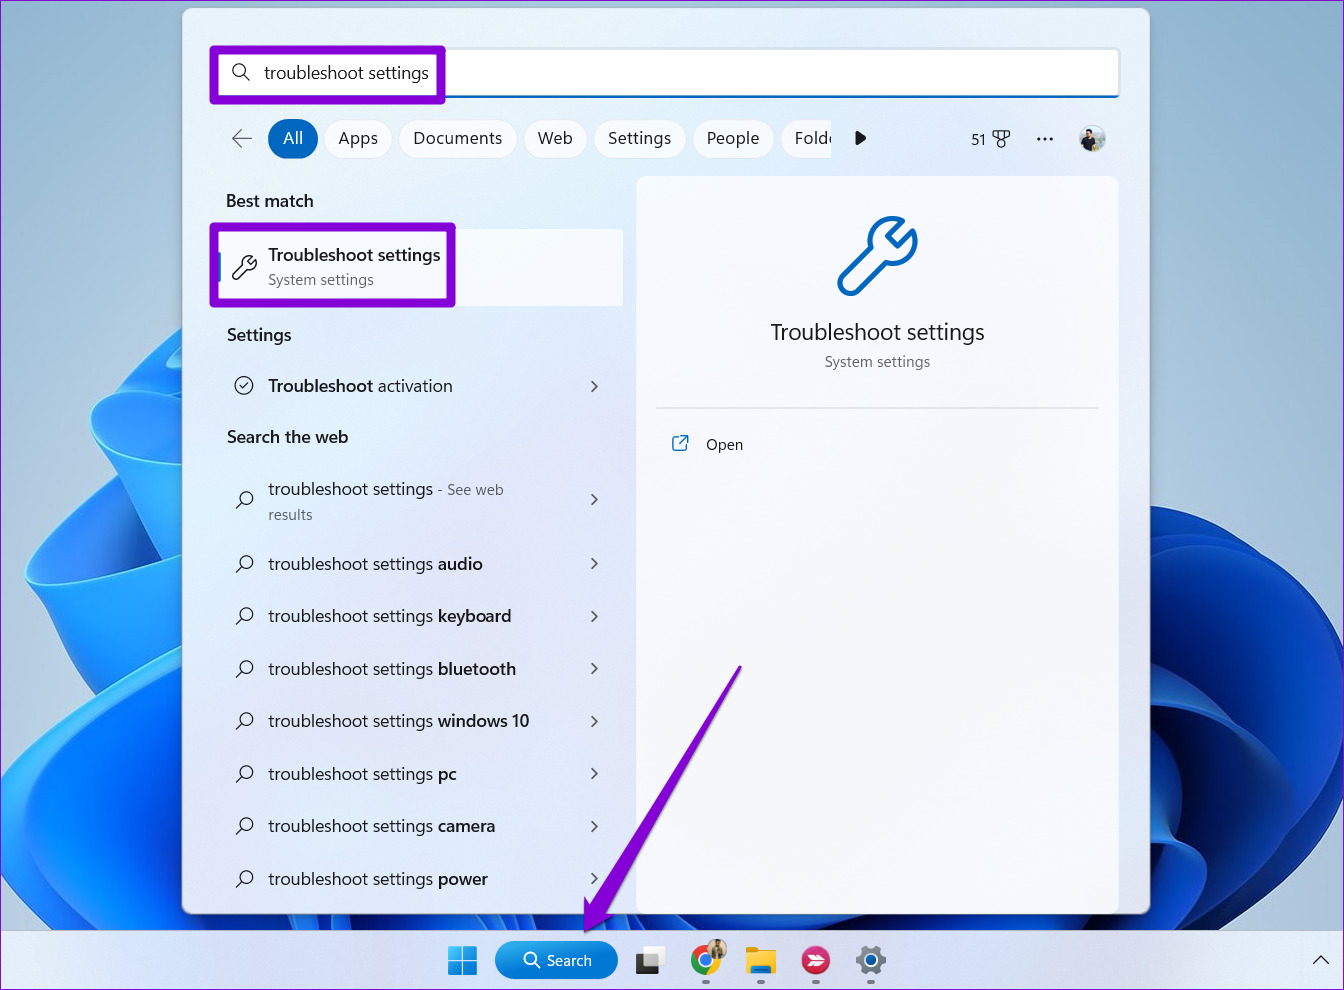
Windows troubleshooters can help you diagnose and fix most system-related issues on your PC. So, if the microphone is still not working despite enabling all the right settings, you can run the Recording Audio troubleshooter on Windows 11. Here are the steps for the same. Step 1: Click the search icon on the Taskbar, type troubleshoot settings in the box and press Enter.
Step 2: Go to Other troubleshooters.
Step 3: Click the Run button next to Recording Audio and follow the on-screen instructions to finish the process.
8. Update or Reinstall Microphone Drivers
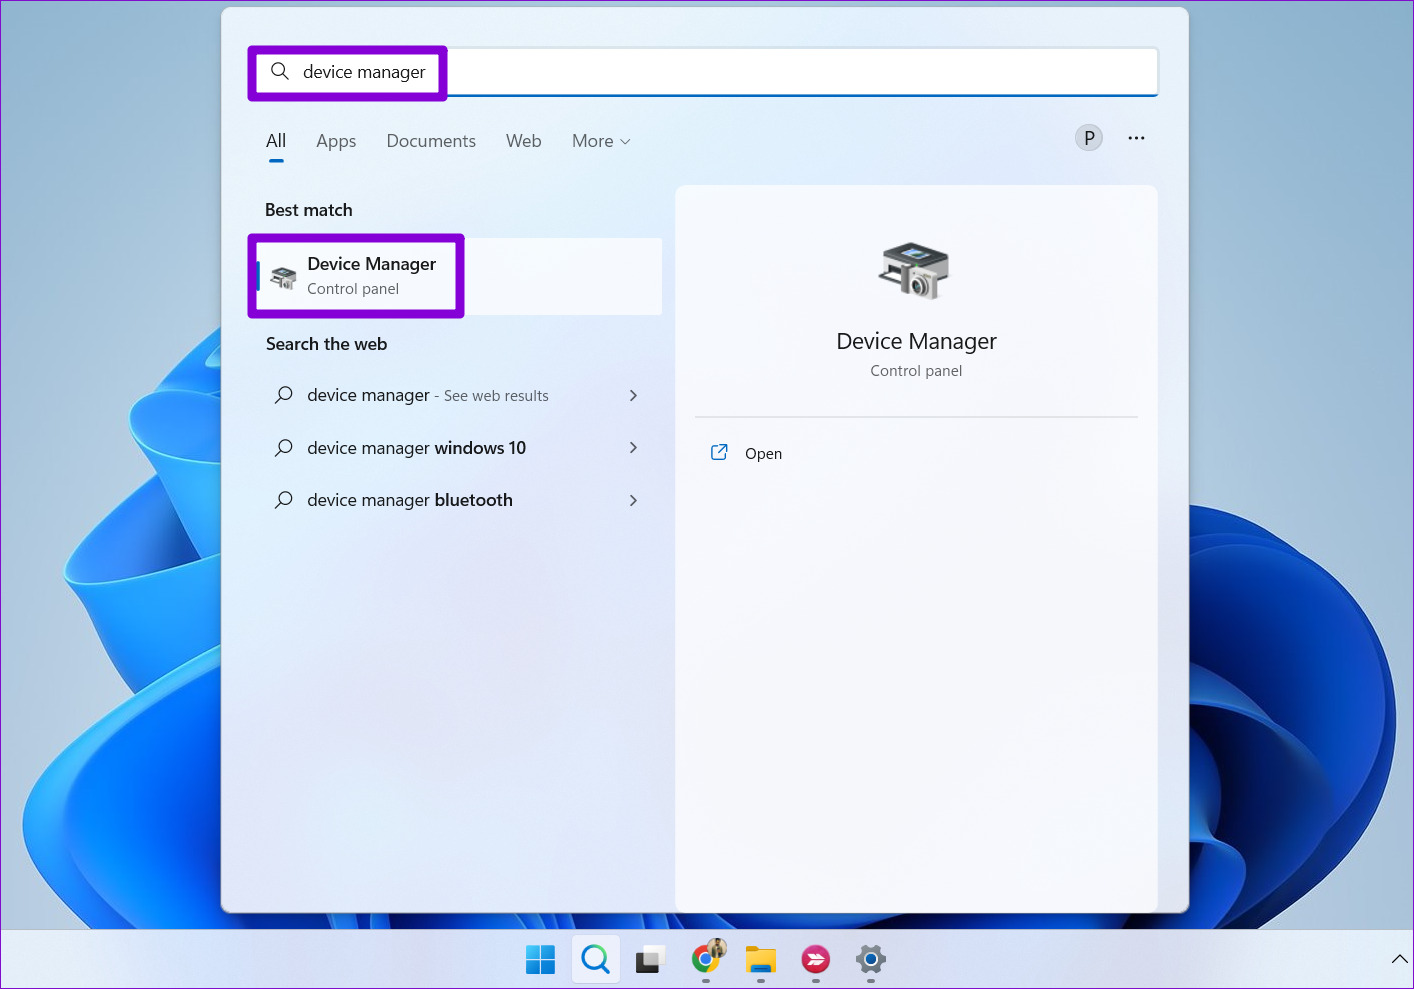
Outdated or missing microphone drivers on your PC can also cause such anomalies. If that’s the case, you can try updating microphone drivers manually and see if that improves the situation. Step 1: Press the Windows key + S to open the search menu. Type device manager in the box and select the first result that appears.
Step 2: Expand ‘Audio inputs and outputs,’ right-click on your microphone, and select Update driver.
From there, follow the on-screen instructions to update the driver. If the issue persists, use Device Manager to uninstall the microphone driver from your PC.
Once removed, restart your PC and Windows should install the missing driver on boot. After that, your microphone should work as before.
9. Disable Exclusive Mode for Your Microphone
It’s possible that one of the apps or programs running on your PC is messing with the microphone and causing problems. If you suspect that to be the case, you can prevent apps from taking exclusive control of your microphone by following the steps below. Step 1: Press the Windows key + R to open the Run dialog. Type mmsys.cpl in the text field and press Enter.
Step 2: Switch to the Recording tab and double-click on your microphone to open its properties.
Step 3: Under the Advanced tab, uncheck the ‘Allow applications to take exclusive control of this device’ checkbox. Then, hit Apply followed by OK.
Loud and Clear
A few things are as annoying as a microphone that isn’t working correctly. If your work requires attending virtual meetings frequently, such microphone issues can be embarrassing. One of the solutions should help you get the microphone to work again. However, if nothing works, you can consider resetting the audio settings on your Windows PC as a last resort. The above article may contain affiliate links which help support Guiding Tech. However, it does not affect our editorial integrity. The content remains unbiased and authentic.
